Top-most window architecture and components
The top-most window is organized as follows:
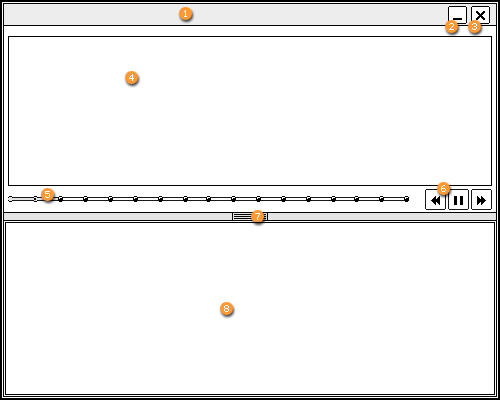
1.
Title bar:
Contains the project title and topic name.
The top-most
window can be moved around within the screen area using drag and drop.
2.
Minimize/maximize:
Clicking on the button minimizes the top-most
window. This permits an unobstructed view of the application. If you would like
to have the full screen view of the top-most window to be restored, you can do
so using the maximize function.
3.
Close:
The Close button terminates concurrent mode and closes
the top-most window.
4.
Bubble-text text box:
The text box displays the various bubble texts
that go with a topic.
5.
Progress display:
The progress display provides an overview of
the topics and displays how the lesson is progressing. Among other information,
it displays the title of the chosen lesson and name of the topic currently being
presented.
6.
Control:
These buttons can be used to control a lesson.
• You can use the Previous topic and Next topic buttons to jump between topics.
• You can use the Pause button to pause the lesson. To resume the lesson, click on Continue.
7.
Central bar:
The central bar divides the window into two areas, the
navigation area with text box and the screenshot view.
The central bar allows
the relative size of the areas to be altered or the screenshot view to be
hidden. To do so, the centrally located button can be moved using drag and drop,
thereby adjusting the areas' height.
To hide the screenshot, click on the
button in the middle of the bar. Clicking again on the central bar displays the
screenshot again.
8.
Screenshot view:
The screenshot of the topic in question is displayed
in the window. The screenshot can be moved within the window using
drag&drop.
The top-most window's functionality essentiality resembles that of the trainer bar. You can find additional information in the sections on the trainer bar.